May
18
2015
18
2015
Managing clients in the Online Invoices system
From the “Clients” menu choose “Manage Clients“.
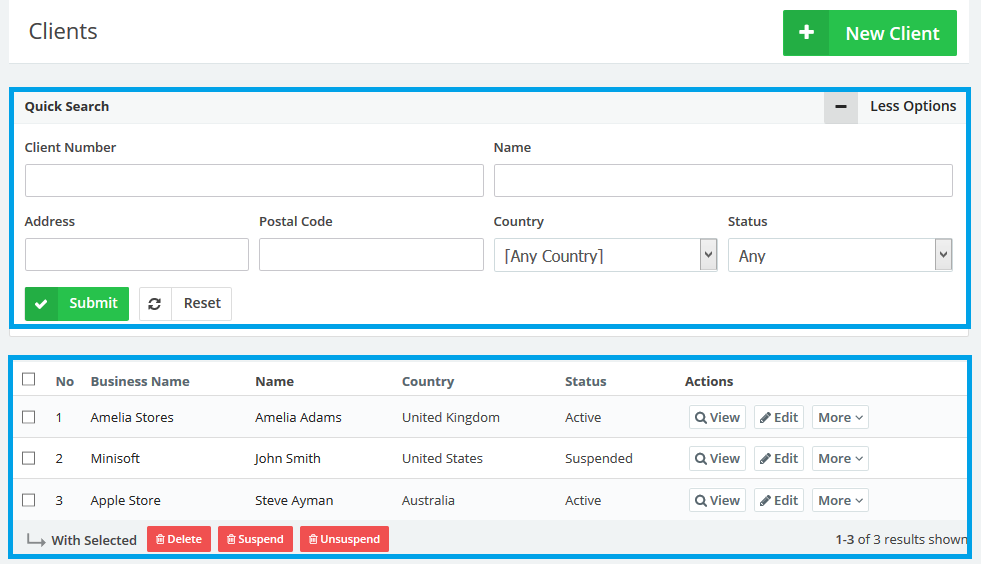
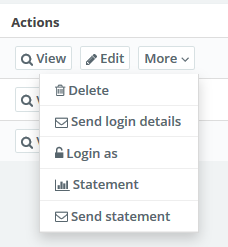
This page lists all current clients. You can use the icons on the right to edit or view client details. The ‘More’ icon also allows you to manage various other functions relating to each client, such as sending statements, resending login details, enabling you to view their client dashboard and so on.
It is also possible to link the client to other functionality if required, so services can be suspended for non payment for instance, and then reinstated at the click of a button.
- Add new Clients to your Online Invoices system by clicking the “New Client” button.
- Use the “Quick Search” tab to search for a client, click the “More Options” button to show all search filters.
- The Clients table shows all your clients with their client numbers, business and full names, country, status plus various “Actions” that you can implement for any specific client.
- Use the select boxes to select multiple clients (if required) and choose a bulk action from Delete, Suspend or unsuspended.
Actions
- View your client’s details.
- Edit your client’s details.
- Delete your client and all its related data.
- Send login details to a client’s email if you chose “Send Via Email” as an “Invoicing Method“.
- Login as a client to the client’s area to view his own invoices, estimate or payments.
- Statement: create a statement for your client’s account.
- Send statement to a client’s email.
View your client’s details.
From “Manage Clients” choose “View” Next to the client you need to view .
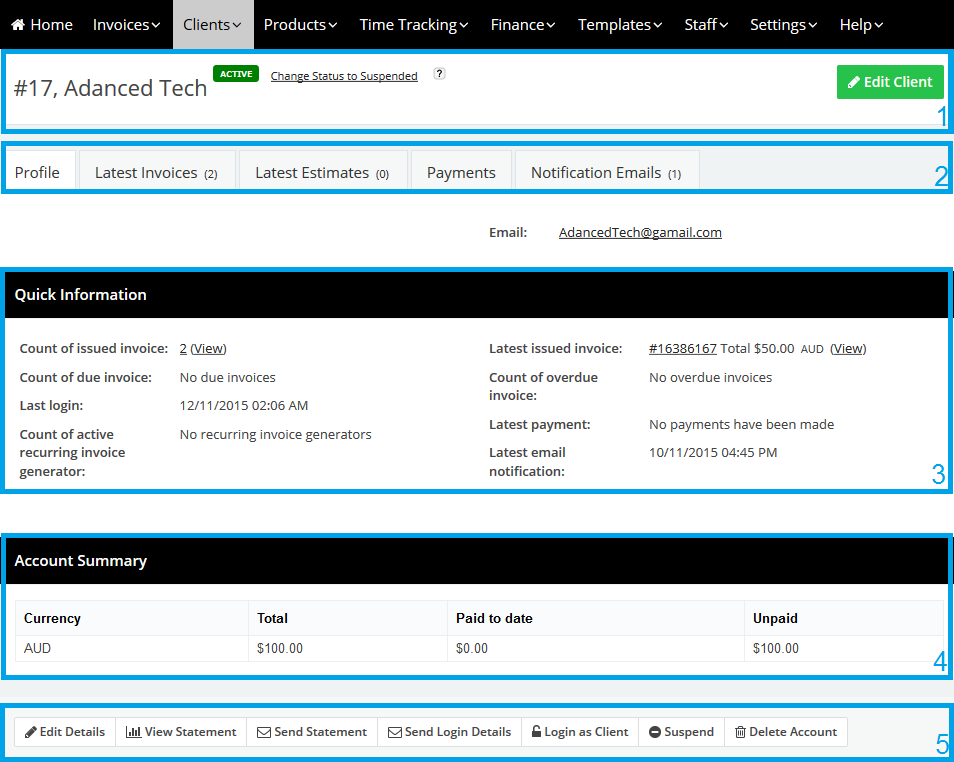
- Show a Client’s name and its status as well as the option to “Suspend“. The result of this is that the client will no longer have access to login and view invoices. The client will not receive any more reminders, recurring invoices or emails from the system. – or click on “Active” if the client was suspended but is to be granted access again.
- These five tabs shows:
- Profile: is the main tab showing the summary of account and client account information.
- Latest invoices: shows the invoices that issued for that client with basic information about the invoice.
- Latest estimates: shows the estimates that issued for that client with basic information about the estimate.
- Payments: shows the latest payments made by the client.
- Notification emails: shows the latest notification emails sent to the client.
- The Quick Information section shows information relating to the latest invoices, recurring invoices, payments and notification emails.
- The Account Summary section shows a table with the total amount invoiced, the paid amount to date and the unpaid amount.
- The Action tab provides the ability to perform certain actions related to your client’s account.
- Edit Client’s Details.
Edit the basic client’s details like Business name, Full name… etc. For more details visit this post : How to add new clients in Online Invoices - View statements.
To view the client account statement for a client click on “Statement“. The “Send to Client” button will send the statement. This document can also be saved as a PDF or printed – also from clicking the “Send to Client” button. - Send statements.
Select this option to directly send a statement. - Send login details for the client.
Send the client the link to the your Online Invoices System with their user name and password so they can access to their latest invoices and estimates. - Login as Client and view the client’s account.
- Suspend the client and this client will no longer has any access to the system.
- Delete the client’s account and all its related data.
- Edit Client’s Details.
How to import a list of clients from a CSV file.
- Open the Excel program
- In the first row add the fields Client Number, Email, Business Name, First Name, Last Name, Telephone, Street Address 1 and Country in the A1…. H1 cells in the same order.
- The field that must be filled out is the business name so you can just add one column with the business name and all the extra fields like email, address, etc. are optional.
- Under every cell fill in all the client’s details as in this images.
- When adding a country only add the short code for the country or the full name.

- After you have added all your items save the Excel file as CSV (Comma delimited).
- Login to your online invoices system.
- From “Clients” menu choose “Manage Clients“.
- Click the “Import” button in the top right corner.

-
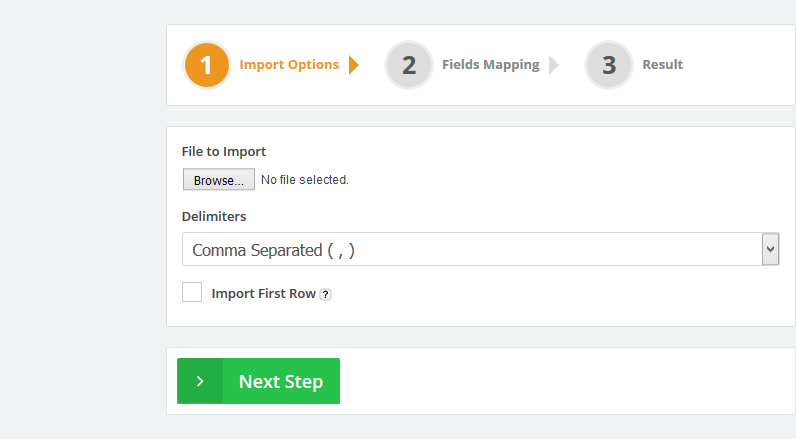
The importing wizard will start. Step 1 Import Options :
- Choose the file to import (the CSV file we previously saved).
- From the Delimiters section choose “Comma Separated“.
- Click the “Import First Row” check box. If your file contains field labels in the first row don’t tick this box. In our case we will not tick the box.
-
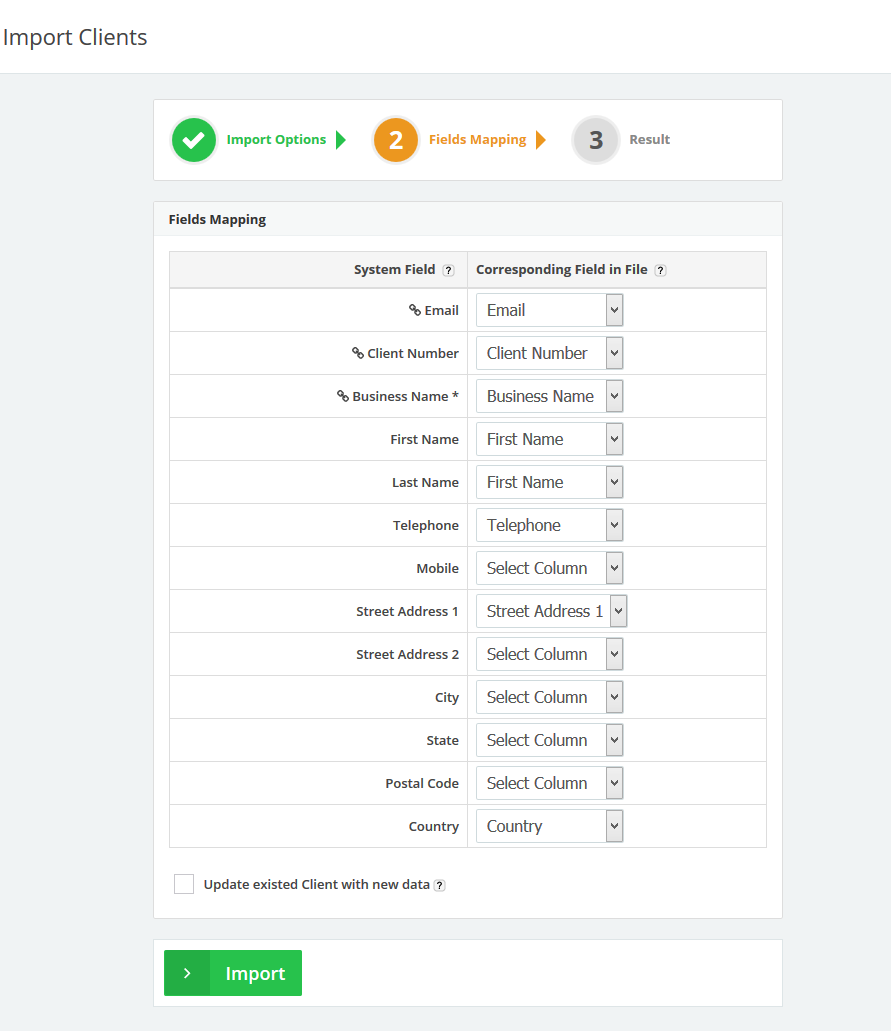
Step 2 Fields Mapping:
- In this step we will tell the system where the data is so the system can add it.
- The “System Field” column: This column shows what fields in the system you may import data into; “*” means that this field must be filled and “Chain icon” means that this field is unique (i.e. if you have checked the “Updated existing client with new data” check box and there was a record that contains the same field value it will update this record with the new imported record. If you didn’t check the “Updated existing client with new data” check box and there was a record with the same data it will ignore importing it and give you errors for this record.).
- The “Corresponding Field in File” column: Each drop-down in this column shows all column headers in your file; please select the equivalent column in your file for each system column (only system fields with “*” are required to have an equivalent selected field).
- In our case we only added new clients and selected a corresponding field in the file for each system field as seen in the above image, and we left the “Updated existed client with new data” check box unchecked as we are only adding new data.
- Click the “Import” button.
-
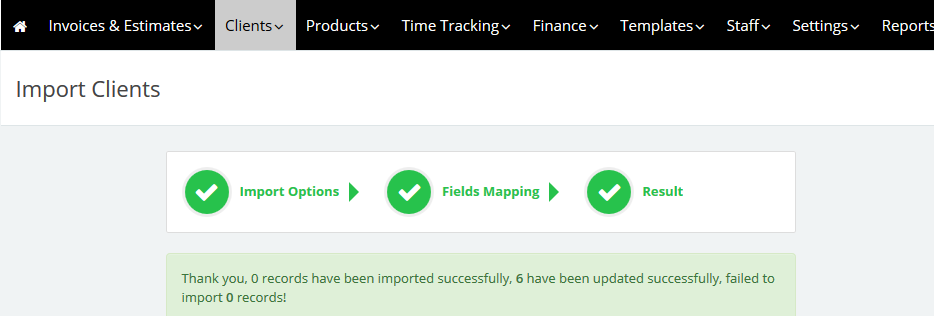
Step 3 Importing:
- The system will take a few seconds to import the fields and save them.
- Go back to the “Manage Clients” page to check the imported items.
Contact us if you have an issue or more questions.
